---
format: html
echo: false
warning: false
---

```{r}
library(surveydown)
```

::: {#welcome .sd-page}

# Welcome to our survey!

```{r}
sd_question(
  type  = 'mc',
  id    = 'penguins',
  label = "Which type of penguin do you like the best?",
  option = c(
    'Adélie'    = 'adelie',
    'Chinstrap' = 'chinstrap',
    'Gentoo'    = 'gentoo'
  )
)

sd_next(next_page = 'end')
```

:::

::: {#end .sd-page}

This it the last page in the survey

:::Survey Components
Overview
Every surveydown survey is composed of a survey and an app, defined in two separate files:
-
survey.qmd: A Quarto document that contains the survey content (pages, questions, etc), which renders to an HTML file. -
app.R: An R script defining a Shiny app that contains the global settings (libraries, database configuration, etc.) and server configuration options (e.g., conditional skipping / display, etc.).
These files must be named survey.qmd and app.R.
They typically look something like this:
library(surveydown)

db <- sd_database(
  host   = "",
  dbname = "",
  port   = "",
  user   = "",
  table  = "",
  ignore = TRUE
)

server <- function(input, output, session) {

  # Define conditional skip logic here (skip to page if a condition is true)
  sd_skip_if()

  # Define  conditional display logic here (show a question if a condition is true)
  sd_show_if()

  # Main server to control the app
  sd_server()
}

shiny::shinyApp(ui = sd_ui(), server = server)
The survey.qmd file
The survey.qmd file is where you define the main survey content of your survey, such as pages, questions, and navigation buttons. It is a standard Quarto document, so you can use markdown (or the RStudio visual editor) to insert text, images, etc. just like you would in any Quarto document.
Note
You do NOT need to render the survey.qmd file, and in fact we do not recommend doing so as the rendered output will not necessarily look like your final survey. Instead, to preview your survey you should locally run your app.
YAML header
The YAML header is at the top of the survey.qmd file. It contains some basic settings, like this:
---
format: html
echo: false
warning: false
---
The only required setting is format: html, as the document should render as an HTML document. The other settings are optional, though we recommend you keep them to ensure a good experience for your respondents. Typically you wouldn’t want warnings or the code defining the survey questions to be displayed in your survey - that’s what the echo: false and warning: false settings are for.
Changing the look and feel
Because the survey.qmd is a Quarto document, you can use any of the Quarto formatting options to change the look and feel of your survey.
For example, you can change the overall survey theme using the theme key:
---
theme: united # Any bootswatch theme
---
There are 25 bootswatch themes to choose from. You can also provide a custom.scss file to further modify the theme, or even combine the two, e.g.:
---
theme: [united, custom.scss]
---
Progress bar
You can modify the survey progress bar with the barcolor and barposition keys, e.g.:
---
barcolor: "#768692"
barposition: top
---
The barcolor key defines the color of the progress bar. It defaults to the primary theme color, but you can change it to any hex code you wish here to overwrite the theme color.
The barposition key defines the position of the progress bar. It defaults to top, but can also be changed to bottom or none (to remove the bar). The progress bar updates on every question the user clicks on, not pages.
The rest of the content in the survey.qmd file is the content you want in your survey, including pages, navigation buttons, and questions.
Adding pages
In surveydown, pages are defined using fences (:::), like this:
::: {#welcome .sd-page}

Page 1 content here

:::

::: {#page2 .sd-page}

Page 2 content here

:::
As you can see, we use three colon symbols :::, called a “fence”, to mark the start and end of pages. This notation is commonly used in Quarto for a variety of use cases, like defining subfigures in images.
In the starting fence, you need to define a page name (e.g. welcome and page2 in the example above) and you need to define the class as .sd-page. Then anything you put between the page fences will appear on that page.
Adding questions
Every survey question is created using the sd_question() function inside a code chunk. The question type is defined by the type argument. For example, to add a multiple choice question, you could insert the following code chunk:
```{r}
sd_question(
  type  = 'mc',
  id    = 'penguins',
  label = "Which is your favorite type of penguin?",
  option = c(
    'Adélie'    = 'adelie',
    'Chinstrap' = 'chinstrap',
    'Gentoo'    = 'gentoo'
  )
)
```
The above code chunk will create a multiple choice question that looks like this:
The sd_question() function can be used to create a variety of question types, like text input, select drop down choices, and more by changing the type argument (see the Questions Types page).
The function has many other arguments for customizing the look and feel of the question, such as the height and width (see the Formatting Questions page).
By default all questions are optional, but you can make questions required in the server options (see the Server Options page for details).
Ending the survey
The simplest way to end a survey is to create a page with no sd_next() button on it. This will effectively serve as a ending page, because the respondent will not be able to navigate anywhere else once reaching a page with no next button.
For example, you may want to have a screen-out page that respondents are sent to if they answer a certain way on a question (e.g., see conditional skipping. You can do this by creating a page with no sd_next() button on it, like this:
::: {#screenout .sd-page}

Sorry, you are not eligible for this survey.

You can close this window now.

:::
When a respondent reaches this page, they will not be able to navigate anywhere else, so the survey is over.
You can also add a button to end the survey programmatically using the sd_close() function inside a code chunk, like this:
```{r}
sd_close(label = 'Close window')
```
This will create a button with the label “Close window” that the respondent can click on to close the survey window. This button can be added anywhere in the survey, not necessarily on the last page - all it does is close the browser window.
Finally, you can also add a button to end the survey and redirect the respondent to another page. You can do this using the sd_redirect() function, like this:
sd_redirect(
  id     = "redirect",
  url    = "https://www.google.com",
  label  = "Redirect to Google",
  button = TRUE,
  newtab = TRUE
)This will create a button with the label “Redirect to Google” that the respondent can click on to be redirected to Google. You can also customize the url to include url parameters. See the External Redirects page for more details.
The app.R file
The app.R file is where you define the global settings and server logic for your survey. It defines a Shiny app, so if you are familiar with Shiny you should feel right at home. The main components of the app.R file are:
- Global settings: where you load the surveydown package and define the database connection.
- Server: where you define the logic of the survey (conditional skipping / display, etc.)
Global settings
The global settings are at the top of the app.R file. At a minimum, you need to load the surveydown package and define the database connection. You can also load other packages / global objects here if you need to. It typically looks like this:
library(surveydown)

db <- sd_database(
  host   = "",
  dbname = "",
  port   = "",
  user   = "",
  table  = ""
)
The db object is used to store survey data - see the Store Data page for details on how to set up the database connection.
Server
The server() function is a standard Shiny server function that takes input, output, and session as arguments. It is where you can set custom control logic and other configuration options, such as conditional display logic with the sd_show_if() function, or conditional skip logic with the sd_skip_if() function.
If you create a new survey using a template, the server() function looks like this:
server <- function(input, output, session) {

  # Define conditional skip logic (skip to page if a condition is true)
  sd_skip_if()

  # Define conditional display logic (show a question if a condition is true)
  sd_show_if()

  # Main server to control the app
  sd_server(db = db)

}
The sd_server() function at the bottom makes everything run. It also includes some optional arguments that you can use to customize the survey.
See the Server Options page for details on the different options you can use to customize the server.
Note
The db = db argument in sd_server() is required if you are using a database connection, which should be defined using the sd_database() function as mentioned above in the Global Settings section. See the Store Data page for more details.
Run code
At the very bottom of the app.R file, you will see the following code:
This code defines the Shiny app and should always be at the bottom of the app.R file.
Note
What’s with the sd_ui() thing?
In a typical Shiny app, you have to define the UI and server functions separately. In a surveydown survey, the UI is a fixed structure that is defined by the sd_ui() function, so simply provide it to the ui argument in shiny::shinyApp() to run the survey.
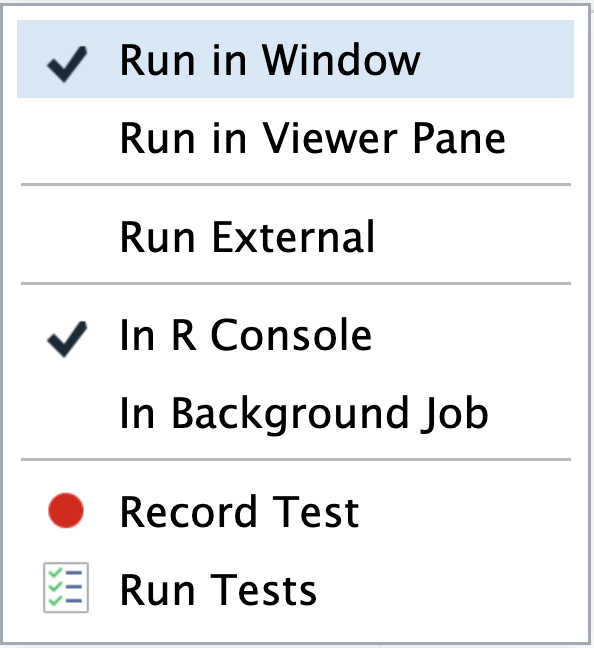
Locally running the survey
To preview your survey, you can run the Shiny app locally by clicking the “Run App” button in RStudio or in your R console run the code shiny::runApp('app.R'). Typically, RStudio will launch the app in a new window, but you can also choose to have the app launch in a dedicated viewer pane, or in your external web browser. Make your selection by clicking the icon next to Run App: